Sorry peeps--I know I haven't posted anything in a fortnight, but modding conditions have not been favorable. With all my machinery in the garage and the cold weather, it has been damn near impossible to motivate myself after getting home from work. In addition, I contracted my biannual crippling illness recently which put me out of commission for a while.
I know these are all just excuses, but sometimes you need to take a step back from the chaos and take a bird's-eye view of the situation. In the past year I sacrificed a great deal of time to our hobby and neglected other things completely. Quite frankly, my sickness reinvigorated my love of music and I've been scouring the underground like a gopher on crack. Modding will always be there--I'm just taking a short break. Before you know it, the sun will be shining again and I will emerge from my hibernation. Like the serpent with its tail in mouth, the cycle will continue.

Satisfying all your Nerf engineering needs since 2012
Saturday, December 28, 2013
Sunday, December 1, 2013
Supermaxx 750 added to sales page!
Hi guys,
It is readily apparent to me now that I own way too air guns. Some I will be modding and adding to the sales page, but other are so trivial to mod that I might as well leave them as an educational experience for all you folks out there getting into air guns. The Supermaxx 750 definitely falls into the latter category--a great first mod! Here she is:

These babies are fairly rare and extremely powerful. The air tank within is about the same size as the Airtech 2000's tank, which means that 4-5 pumps will produce enough power to leave a serious welt at close range. I did a crappy mod guide for this blaster shortly after I started this blog--fortunately it was short enough to actually get the point across.
My asking price is $20 shipped, the same as an Airtech 2000. See the sales page for details if you are interested!
~T
Tuesday, November 26, 2013
Tornado acquired!
Hey peeps,
Look what came in the mail:
This funny-looking creature goes by the name Koosh Vortex Tornado. As you can see, the front has a strange protrusion--this thing does not shoot darts at all! It shoots a very rare type of ammunition, the Koosh Spinfire Ring. Utilizing a very special propulsion system, this blaster has been known to launch the rubber discs over 70 feet. Daaaaaaamn. Well, the only downside is that they don't travel too fast, so a simple step to the side will be enough to dodge a ring. Not to mention, even a slight breeze will completely throw off your aim. Anyways, I have no rings, nor any desire to use them.
People often compare the Tornado to the Crossbow, and ergonomically they are very similar--comfortable handles and stocks, and priming at the rear. However, there is one major difference between the two: modding potential. The fact is, Crossbows are skinny. You can't fit a plunger tube in there with a diameter over 1 1/4'' without bulging the shell out. The Tornado, on the other hand, has a ton of real estate inside--enough to house a 1 1/2'' PVC plunger tube! This thing will be compact and powerful.
This project will be put on the back burner for now--I've been enjoying my period of rest after finishing my RainbowPump. Soon I shall resume again and turn my Rebelle into a femme fatale. Stay tuned!
~T
P.S. I like italics.
Look what came in the mail:
 |
| Made in 1998! |
People often compare the Tornado to the Crossbow, and ergonomically they are very similar--comfortable handles and stocks, and priming at the rear. However, there is one major difference between the two: modding potential. The fact is, Crossbows are skinny. You can't fit a plunger tube in there with a diameter over 1 1/4'' without bulging the shell out. The Tornado, on the other hand, has a ton of real estate inside--enough to house a 1 1/2'' PVC plunger tube! This thing will be compact and powerful.
This project will be put on the back burner for now--I've been enjoying my period of rest after finishing my RainbowPump. Soon I shall resume again and turn my Rebelle into a femme fatale. Stay tuned!
~T
P.S. I like italics.
Wednesday, November 20, 2013
Post #100!
Hey guys,
I can't believe it but I've actually hit 100 posts! To celebrate, I put together a little surprise for you all--keep in mind that I used my camera, so quality is not the greatest. Enjoy!
I can't believe it but I've actually hit 100 posts! To celebrate, I put together a little surprise for you all--keep in mind that I used my camera, so quality is not the greatest. Enjoy!
Saturday, November 16, 2013
My first homemade: a Mini-RainbowPump!
Sup guys,
It has been a while, and I'm extremely excited to bring you this writeup--it just might be the finest thing I've ever produced! I know you guys have probably grown impatient with the lack of posts as of late, but I wanted this project to really shine. After many hours of toil and many beers, I have finally brought my first homemade to fruition. In fact, I probably spent more money on booze than actual materials for this project. Hey, as Samuel Tayler Coleridge once said, "Some men are like musical glasses--to produce their finest tones you must keep them wet." Never mind the holes that were drilled completely off-kilter in the pump grip and all the random Dremel marks...
In any case, my construction process was mainly based off Ryan's RainbowPump writeup. For those that aren't familiar with it, it looks like this:

Mine is very similar, but here are the major differences:
- 8.5'' K26, rather than a full 11''. Allows for more compression (power)
- Shortened grip and plunger tube by 2''
- String stop replaced by traditional foam rubber padding
- Wooden grip replaced by HDPE (cutting board)
- Plunger head is screwed in with a 2'' screw
- Trigger is 1/4'' thick, rather than 1''
- Wye is not permanently attached
- Rear stock changed
- Clear and white color scheme wherever possible!
Sunday, November 10, 2013
RainbowPump progress: Part 2!
Sup guys,
I've been steadily working through the build, and I've finally hit a snag today--my 6-32 tap was not long enough to tap the hole in my plunger rod. With my new tap being days away from delivery, I figured that this would be a good time to give you guys an update:

As you can see, there is not much left to do! Only the front bushing and shoulder stock need addressing before this beast sees the light of day. The end is nigh, fellas!
~T
Sunday, November 3, 2013
RainbowPump progress--slow and steady!
Hey guys,
I finally have laid Grand Theft Auto to rest and modding has once again resumed as normal. Here's some teaser pics of the handle that I just finished:


It is made primarily from HDPE (cutting board) and polycarbonate. Feels real nice in the hand! Hang in there, guys--it shouldn't be too much longer until this one sees the light of day.
Cheers,
~T
I finally have laid Grand Theft Auto to rest and modding has once again resumed as normal. Here's some teaser pics of the handle that I just finished:


Cheers,
~T
Wednesday, October 16, 2013
Next project plans have been finalized!
Sup guys,
Progress has been a little slow lately...

In any case, I've been slowly planning my next project--it's going to be a beefy one and I want it done right! For those that don't know, I'm planning to build my first 100% homemade blaster: a RainbowPump. Ryan's version uses a full-length K26, but only utilizes 6'' of compression. Quertyman's version gets near-full compression with 7'' of draw, but unfortunately I already bought the parts for Ryan's version before he even wrote it up.
I have decided to take the middle ground: achieve the same near-full compression as quertyman, but use Ryan's internal coupler design and the original 6'' of draw spec. Some of you may be frowning at this, but I'm not going to use a full-length K26! After cutting down the spring and killing some dead space from the original design, the blaster will be a few inches shorter. It should theoretically shoot harder than a normal RBP! Stay tuned for the:
Shortened RainbowPump
I promise I'll get started soon.....after a couple more missions.
~T
Wednesday, October 2, 2013
Longshot shotgun grip: The Final Chapter!
Sup guys and girlfriend,
I can't believe I'm saying this, but it's finally time to wrap up the Longshot once and for all. It has been a tale of heartbreak, sacrifice, and persistence. At last it is time to move on to bigger and better things. After this mod, I can rest knowing that I've made this Longshot everything it could ever be. Join me in the final chapter in the Saga of the Yellow Monster.
I can't believe I'm saying this, but it's finally time to wrap up the Longshot once and for all. It has been a tale of heartbreak, sacrifice, and persistence. At last it is time to move on to bigger and better things. After this mod, I can rest knowing that I've made this Longshot everything it could ever be. Join me in the final chapter in the Saga of the Yellow Monster.
 |
| Where we left off... |
Monday, September 30, 2013
Product Review: Flying Dutchman Scroll Saw Blades
What is up, my brethren? When it comes to Nerf blogs, one thing you don't see too much of is tool talk. Tool selection is one of the most important parts of modding, and quality tools can save you loads of time and frustration. I remember my early days of modding when I didn't even own a Dremel--it took DAYS to hand file anything! Anyways, I have discovered a great new product recently that I thought I'd share with you guys: Flying Dutchman scroll saw blades!


Monday, September 23, 2013
Progress!
Hey guys,
I'm pretty terrible at making posts about stuff that's currently in progress. This results in long gaps between chunky posts, so I'll try and get better at timing at least one update post per mod to satiate that appetite for my goodies. In this case it's way late, but better late than never!

Cheers,
~T
Thursday, September 12, 2013
Longstrike mod!
Sup guys,
I've been working on an extra special project lately. I browse the forums quite a bit, and sometimes I see something that really impresses me. In this case, it was a Longstrike. It's not often you get all hot and bothered by a blaster that absolutely blows stock. However, nowadays I see blasters in a different light than I used to. Now that I have the means to create any of my own components, there's no point in reusing Hasbro's internals at all. A blaster's worth to me is now measured in how good it looks and how easy it in to incorporate internals and other goodies. The Longstrike satisfies all my requirements, and just happens to have enough room for a 1.5'' PVC plunger tube! This mod is literally a wolf in sheep's clothing--the shell is the only thing original at all in this mod. Shall we?

I've been working on an extra special project lately. I browse the forums quite a bit, and sometimes I see something that really impresses me. In this case, it was a Longstrike. It's not often you get all hot and bothered by a blaster that absolutely blows stock. However, nowadays I see blasters in a different light than I used to. Now that I have the means to create any of my own components, there's no point in reusing Hasbro's internals at all. A blaster's worth to me is now measured in how good it looks and how easy it in to incorporate internals and other goodies. The Longstrike satisfies all my requirements, and just happens to have enough room for a 1.5'' PVC plunger tube! This mod is literally a wolf in sheep's clothing--the shell is the only thing original at all in this mod. Shall we?

Sunday, September 1, 2013
Stampede repairs complete!
Yo, remember this?

Allow me to refresh all of our memories... Back in the day I modded a Stampede, unknowing of the numerous pitfalls that would stymie me in my travels. One of these pitfalls was the stripping of a key gear that drives the blaster. A square hole became round, courtesy 4 unprotected Trustfire batteries putting out 16.8V and mucho current.
For many months the Stampede laid dormant after every form of glue and epoxy I had was used in the repair effort. I moved on to other projects, figuring some day I would find an answer. I figured metal would be optimal, and I first found some bronze gears made in Australia, but the seller was MIA. Recently I found PAK D, a company from Singapore that casts Stampede gears out of aluminum and charges an arm and a leg for them ($55 + $40 shipping). Eventually I learned about solvents, and I changed my course of action. Look what I got in the mail recently:
Friday, August 30, 2013
Centurion Review
Hello people,
I haven't posted in a while, and I just got my Centurion in the mail recently so I figured I might as well do a quick review of Nerf's most ridiculous blaster to date!

I haven't posted in a while, and I just got my Centurion in the mail recently so I figured I might as well do a quick review of Nerf's most ridiculous blaster to date!

Monday, August 12, 2013
Airtech 4000 added to sales page!
Hey guys,
The Airtech 4000 is the king of the Airtech line with twelve barrels, turret auto-rotation, and a massive air tank. Seeing that I have two of these bad boys, I've decided to pass one on to the community. The auto-rotation works perfectly, it still successfully shoots darts, and the shell is in tiptop shape! Asking price is $30, and I haven't figured out the cheapest way to ship it yet:

Cheers!
~T
Saturday, August 10, 2013
Time to resurrect a monster...
Hello people,
Look what came in the mail recently:

For those of you that have never seen the likes, it's a Stampede's gearbox. The battery pack drives an electric motor that drives the gearbox that eventually primes the blaster. The problem arises when you increase the voltage from 6V to 16.8V--the torque from the motor ends up stripping one of the gears! For those of you that don't remember:
This time, I will be making a "preemptive strike" on the gear before it has a chance to strip itself. I will be thoroughly cleaning the contact area and using powerful solvents to fuse the gear to it's mount--a much better solution than trying to buy metal gears off flaky Chinese Nerf companies.
In other news, I have been slacking off with the modding due to car maintenance, practicing music, and various forms of debauchery. I promise I'll get cracking on the Longstrike/Stampede/LS shotgun grip soon--there just aren't enough hours in the day! Please sit tight while I square things away one at a time.
Regards,
~T da B
Monday, August 5, 2013
How to make a Rainbow Catch
My mind has been elsewhere for the past week. Something in that clean Adirondack air made me take a good look at life and make a few tweaks. Not to worry--I'm not quitting modding, just making a few adjustments. T da B has always been a musician at heart, and he has decided to dust off the old bass guitar and get thumping once again!
Let us shift back to the topic at hand: the Rainbow Catch. Invented in 2010, it was the successor to the Plusbow Catch. Its purpose was to do away with the latter's bulky side plates and be completely contained in the plunger tube. You can find templates on Nerfhaven.com, but only for the original size that fits in 1 1/4'' PVC. The Rainbow Catch that I am building is intended for 1 1/2'' PVC, so I had to do it myself with no templates. Life isn't just cutting and pasting!
 |
| The original Rainbow |
Friday, July 26, 2013
Back to carry the torch!
Sup readers,
I'm finally back from my vacation! Check it:


Dope ass vacation. Secret plans after the jump:
I'm finally back from my vacation! Check it:


Dope ass vacation. Secret plans after the jump:
Monday, July 8, 2013
Goodbye for 2 weeks!
Hey guys,
I'll be leaving for a two-week vacation tomorrow, so don't be surprised by the lack of posts. I will be here:


Don't worry people--I'll be back soon enough! I also decided to leave you guys a surprise after the jump...
I'll be leaving for a two-week vacation tomorrow, so don't be surprised by the lack of posts. I will be here:


Don't worry people--I'll be back soon enough! I also decided to leave you guys a surprise after the jump...
Wednesday, July 3, 2013
One year of modding down!
Hey guys,
I just looked at the calendar and realized that I've reached my one year modding anniversary! Time really flies when you're having fun, eh? A year ago I decided to try my luck at this hobby and see if it was actually fun. By today I've completed many mods, and I'm well on my way to building my first homemade and becoming a mod master.
Thank you all for following me and checking out my work--my methods and skills will only get better with time, and I have a lot more to contribute to the Nerf internet community. I hope you guys have been kept entertained this past year--there is much more work to be done! I'll try some new things as well, like making a video or something. Onwards and upwards!
Sincerely,
~T da B
Longshot repairs: Part 2!
Sup lady and gentlemen,
It seems like I'll never see the end of my Longshot modding--just when I think I have it all figured out, something else decides to fail on me. This time it was my trigger catch that bit the dust so I decided to make a new one out of 1/8'' polycarbonate as well as a new plunger to complement it.
I started out by tracing the old trigger catch on a piece of 1/8'' polycarbonate:

Saturday, June 29, 2013
New blasters coming from Hasbro!
Sup guys,
I know that most of you are just used to me posting ridiculously lengthy write-ups about my mods, or updates on my ridiculously long write-ups, so I've decided to change things up a bit. I'm going to give my opinion on some of the new blasters coming out this fall, now that enough information has leaked about the blasters and their internals. Sometimes it's good to see what the future holds to get a start on mod planning. Let's start out with the lamest of the bunch--the Blazin' Bow!

I know that most of you are just used to me posting ridiculously lengthy write-ups about my mods, or updates on my ridiculously long write-ups, so I've decided to change things up a bit. I'm going to give my opinion on some of the new blasters coming out this fall, now that enough information has leaked about the blasters and their internals. Sometimes it's good to see what the future holds to get a start on mod planning. Let's start out with the lamest of the bunch--the Blazin' Bow!

Thursday, June 27, 2013
Tech Target Overhaul!

Sup guys,
It has been a while--I've been busy as a B working on Zero's goods. All I have to say is that it's going to hurt sending this one off. I believe this is one of my finest mods to date--no joke! A lot of time, thought, and experimentation went into this bad boy, and the results are better than I could have ever imagined. Not to toot my own horn, but I've really outdone myself with this one. Here's some of the fabulous features of this fine feisty firearm:
- 1'' polycarbonate plunger tube
- 6 1/4'' K26 spring at damn near full compression (over 4'' of draw)
- Custom paint job and other cosmetics (ammo holders)
- Delrin plunger rod
- Dual coupler setup (PVC/CPVC)
- No bolt through the shell! Plunger tube is secured via pixie dust and magic incantations
Sunday, June 23, 2013
Something to whet the appetite...

Hey guys,
I wanted to hold out until I was completely finished, but I guess I'll just blow my partial wad right now. I'm a few days away from making this Tech Target something worthy of being wielded, and it has really been a learning experience for me. Painting isn't too intellectually demanding, but my god does it take a lot of work. I have earned a newfound respect for painters and the work they do. I enlisted the help of my girlfriend for this one and put her nail-painting skills to the test. I think I could really get into this painting business!
As far as the modding side goes, this mod has borrowed from the write-ups of yesteryore, but has its own dirty little secret as well. Unlike most mods that replace internals, this one will not be putting a bolt through the shell to keep things together! I didn't want to disrupt the cosmetic lines at the front of the blaster, so I found a way to keep the plunger tube from falling out as well as rotating all from within!
Just a few more days, I promise. Zero, send me your damn contact info!
~T
Saturday, June 15, 2013
Giveaway Prize Teaser
Hi guys,
I have finally started working on my giveaway prize. I don't want to give it away completely, so here's a look at most of the materials I will be using:

I promised that I'd start painting blasters this year, and the time has finally come. I will be doing an initial coat of flat black, followed by some hand painting, then finishing it off with a few clear coats. This will be my first complete paint job ever, so I apologize to Zero (the recipient of my creation) if my paint job turns out looking like Honey Boo Boo's mother naked.
Sit tight!
~T
Monday, June 10, 2013
A winner for the giveaway has been chosen!
Sup guys,
I know I promised you all a giveaway, and I'm a man of my word! As you may recall, I said that after 10,000 views I would select a random winner from amongst my followers and only my followers. To select a winner, I used a random number generator from my favorite programming language, Python. Two lines of code is all I needed:
import random
random.randint(1, 9)
Alas, a winner has been chosen from amongst my nine followers! *drumroll*
The winner of my 10,000 view giveaway is:
Saturday, June 8, 2013
Massive Update and Next up...

Hi guys,
I'm extremely excited for my upcoming projects--more than usual, actually. There will be one more "mod" (if you want to call it that) leading into the grand finale--100% homemades! Over time my percentages have increased from 0% homemade to around 90% homemade now. My Longstrike is about to receive some nice upgrades, with a clear 1 1/2'' clear PVC plunger tube and U-cup plunger head. It will be pull-back priming to begin with, and later converted to pump-action. It will also contain my first Rainbow Catch! For those who are unfamiliar with this component, it is basically the premier design for homemade trigger catches. It encompasses everything I strive for--simplicity and effectiveness! This is a rather large update, so I'm breaking this goddamn page.
Thursday, June 6, 2013
Brass slide breech #2!

Sup guys,
At the last war I attended, I was stuck playing pistol rounds with a single barrel speedloader, which sucked pretty hard. I felt like the dudes in the Civil War that carried powder and ramrods--it took days to reload! I knew that it was time for an upgrade, and I decided to mod myself a 6'' slide breech to complement my original 12'' breech. This time I went with brass hardware to complement my breech, and I think it turned out beautifully!

This breech was specifically designed to be as short as possible to keep my pistols compact. The opening barely fits my 1 1/4'' Stefans. The overall length is 8 3/8'', which isn't too bad. Extra length is needed at the attachment point to keep the acorn nut from being stopped by the 1/2'' coupler, as well as at the front of the breech to keep the brass barrel from being exposed while opening the breech. This breech unfortunately has two problems with it:
- The PVC/brass barrel fit is a little loose, so the barrel slides down if you open the breech and point the barrel upwards. More of an inconvenience than a problem I would say, although I'm not sure this is solvable.
- My 1/2'' brass piece (thinnest piece) wasn't cut with a pipe cutter the flare the end inward, so some darts get pushed into it. I will be solving this by gluing a piece of 15/32'' brass into the 1/2'' piece.

Overall, I like my second very much--it makes reloading a lot quicker and looks sexy as well. If you want to make one of these for yourself, check out my original post!
Thanks for reading!
~T da B
Monday, June 3, 2013
Almost 10,000 views!
Hey guys,
I can't believe that it's actually happening, but my blog is about to surpass 10,000 views! This is pretty amazing, considering the fact that I haven't been on the scene for very long at all. Like many other blogs, I would like to do something special for you guys--I would like to do a giveaway! It will be limited only to those who are following me--if your friend wants a crack at the giveaway, they will have to follow this blog first!
Now, I'd like to ask for all of your opinions first. What should I give away?
Thanks for sticking with me!
~T
I can't believe that it's actually happening, but my blog is about to surpass 10,000 views! This is pretty amazing, considering the fact that I haven't been on the scene for very long at all. Like many other blogs, I would like to do something special for you guys--I would like to do a giveaway! It will be limited only to those who are following me--if your friend wants a crack at the giveaway, they will have to follow this blog first!
Now, I'd like to ask for all of your opinions first. What should I give away?
- A stock blaster?
- A modded blaster?
- A blaster attachment (like a slide breech)?
- Pictures of myself posing with just a blaster covering my junk?
Thanks for sticking with me!
~T
Sunday, June 2, 2013
Brothers in arms

You are looking at a band of battle-hardened warriors! Tonight was another great night of Nerf out at Bridges Rick Gym in El Cerrito, and I had a blast. We had a pretty good turnout, and I was pleased to see more modded blasters this time around. I don't think the game is fun at all with stock blasters, since there is no fear of getting hit, and sometimes you don't even feel the shot when you DO get hit.
This time around we also got to play some pistol rounds, which I enjoyed quite a bit. Unfortunately, my Longshot decided to take a shit on me this morning, and I couldn't get it fixed in time for battle (trigger catch). Of course something like that would only happen last minute....FFFFF. In any case, I had a lot of fun and I hope to see the same scruffy looking bunch of Nerf herders once again in the future!
Cheers,
~T
Thursday, May 30, 2013
Firestrike mod!

Hello readers,
Sorry for the delay, but I'm back! Due to the caliber of my mods now, I will be unable to output posts at the same rate as I have in the past. Such is the price to pay in the quest for excellence. Anyways, a few weeks ago I decided that I wasn't showing pistols enough love, so I decide to take one to the absolute max. This mod is my finest to date, and I went through a lot of trouble to get this thing functional. Here are some of its wonderful properties:
- 1 1/4'' polycarbonate plunger tube
- Delrin plunger rod
- 4 1/4'' K26 at full compression
- 1 1/8'' rubber grommet seal
- Custom front spring spacer
- Custom rear spring blocker
- Custom trigger catch
Saturday, May 18, 2013
Happy birthday, T da B!
Thank you all for gracing my blog with your presence--now that I'm 27 years old, I feel like I have more than ever to contribute to the Nerf Internet Community! The last year of my life saw more change than ever, including the birth of my Nerf passion. I have big plans for my 27th year on this Earth, including the following:
- Paint some blasters
- Build my first homemade
- Attend more wars
- Build my girlfriend a shoe rack
- Mod my Crossbow!
Thursday, May 16, 2013
Benchtop sander acquired!

Sup guys!
You're looking at the latest addition to my workshop--a Harbor Freight combo belt sander and disc sander. This tool is going to drastically cut down on sanding, one of the most time-consuming parts of modding. In addition, I will be able to perfectly square the ends of all the pipes I cut! The sanding belt is 4'' x 36'' and the sanding disc is 6'' in diameter, and the device comes with a mitre gauge to square your workpiece--check it out:

I removed the disc for the moment, since I won't be needing it for my projects in the immediate future. Some of you may be groaning at the fact that I went with Harbor Freight, but the deal I got was too sweet to pass up. In addition to being on sale, I had a coupon for 20% off and ended up getting the sander for $64! It's my first sander, so I really don't think I need to get something super fancy and expensive. I also bought an accessory to prolong the life of my sandpaper--a sanding belt cleaner. Basically it's a big eraser that you rub on your sanding belt after a job to remove any particles that get stuck to the sandpaper.

At this point, my workshop is just about complete! With my drill press, scroll saw, and belt sander, I can't think of any more essential tools that I might need to complete Nerf projects and beyond. Of course it would be nice to have a lathe or a milling machine, but even the cheapest ones are expensive. I'm completely content at this point with my tool repertoire--I can do almost anything!
~T da B
Thursday, May 9, 2013
Ultimate Supermaxx 1500 Mod!

Sup readers,
I know that you've all been waiting a long time for this one, but the time has finally come! After many setbacks, I have finally succeeded in turning my Supermaxx 1500 into a war-worthy primary up to T da B's standards. For this mod, I had a few requirements:
- Hopper clip for maximum rate of fire
- Removable stock
- Capable of reliably handling 100+ psi
- Safety valve and psi gauge
Sunday, May 5, 2013
Solving the Angel Breech
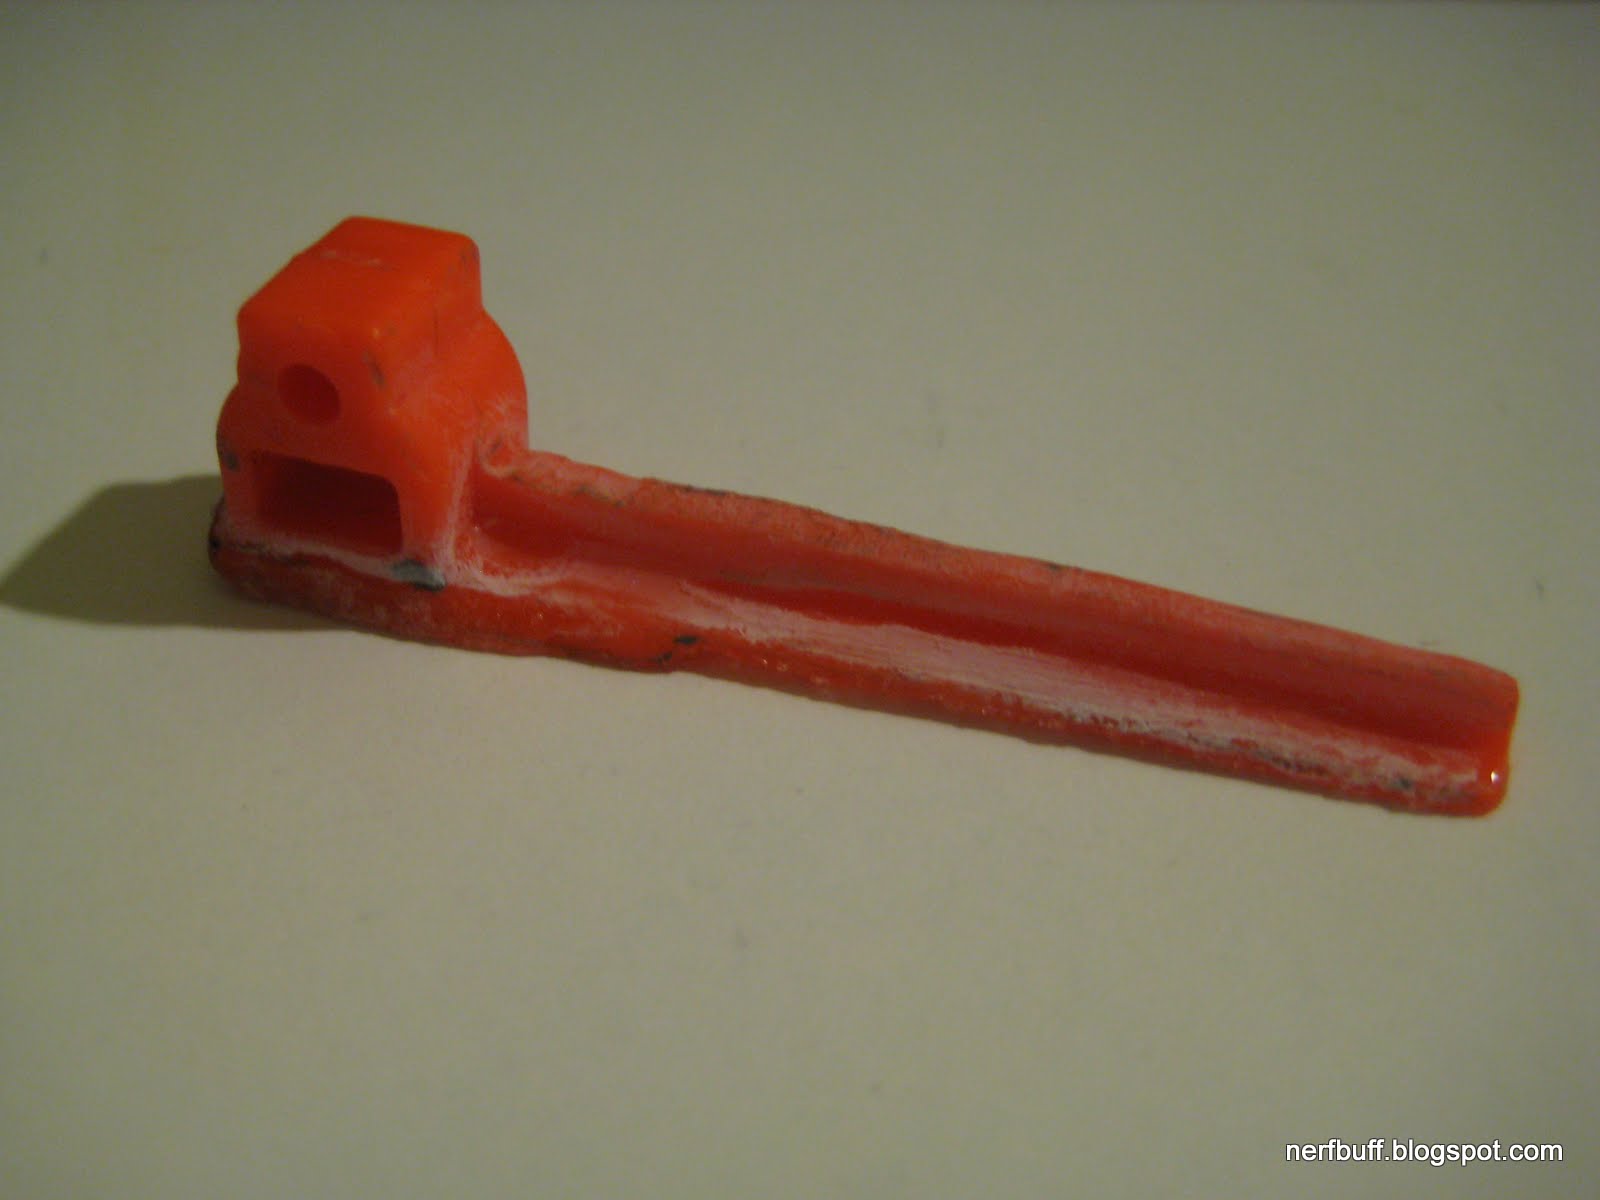
Sup guys,
This little orange piece has been the bane of my existence since I first decided to make an Angel Breech for my Longshot. For those of you that don't know, this little orange guy is the attachment point between the bolt sled and breech--the #1 point of failure. Pretty much every brass breech mod that I've read calls for gluing this piece to your brass breech. I have tried many types of epoxy, including the one from the original breech created by ForsakenAngel24, but none of them have had enough strength to withstand my K26 spring. In typical T da B fashion, I set out to solve this annoyance once and for all. This time, it involves fire!
Back in action!
Sup guys,
It has been a while, but I'm back to the land of the living. Last month was a tough one for me due to sickness and a record-breaking workload at my job. We just released the newest version of our product and I was 100% in charge of testing the user interface, so I busted my ass to stamp out as many bugs as I could in a short time. Now that it's May, I can finally enjoy a short reprieve.
Although I didn't post very much at all last month, I was still putting in work behind the scenes. The main blaster that I've been working on is my Supermaxx 1500:

I have really been struggling to cram all the components I need into this slim package. It's no problem in a chunky Airtech 3000, but the SM1500 has much less room inside for goodies. Also, no one else has ever attempted what I am doing, so I have nobody's work to use for reference. On Monday I will be receiving what is hopefully my last part to finish the mod (mini hose clamps). In the end, my setup should be able to reliably handle 100+ psi!
The other mod that I have been working on is more of a repair than a mod--fixing my Longshot's brass breech. I spent a great deal of time last month learning about soldering, brazing, and welding and have finally acquired the necessary components to actually do it! On the bottom of the picture a bar of copper that will be sculpted into a new bolt sled attachment nub. The white dropper contains flux, which is used to prepare a surface for soldering. It removes the oxides on the metal surface and makes the solder stick to wherever you apply it. In the middle of the picture is the solder, which is usually a combination of metals. Mine contains silver, which causes the solder joint to be stronger than the actual metals you are bonding! Finally, on the left is my new butane torch, which can put out a flame that is 2500 degrees Fahrenheit. Stay tuned for a write-up.

Hang in there, guys!
~T
Wednesday, April 10, 2013

Sunday, April 7, 2013
T da B's first war!

Sup guys,
Last night I had the pleasure of enjoying my first Nerf war in El Cerrito, California! About 25 of us showed up armed to the teeth for some Saturday night Nerfing. Most people were sporting Elite series blasters, while your truly took his Big Bad Bow, Pump Action Shotgun, and Panther. We got to play team deathmatch and capture the flag in one of the coolest venues I have ever been in--a rock-climbing gym! We were allowed to climb up the structures and snipe up top. There are thick wooden rafter up there that can be used for cover, and they made for some awesome firefights!
The first few games I got absolutely raped, but eventually my Call of Duty skills kicked in and I finished the final round with only a single death! My modded blasters gave me a significant range advantage over other people, so I was basically our team's sniper whose main job was to take out their guys up in the rafters. Suffice it to say, I had a great time and I'll definitely be back for the next Nerf night! The next war will be held on Sunday, April 28 at the Bridges Rock Gym in El Cerrito--hope to see you NorCal Nerfers there!
~T
Tuesday, April 2, 2013
Brass breeched Longshot mod!
Sup reader,
It has been a long time coming, but I have finally finished modding my Longshot! After royally fucking up my breech the first time, I have revamped my original design to make it even better than the original. Inspirations for this mod include SgNerf's original brass breech, SgNerf's quarter pipe upgrade, and Samurai_kidd's Alternative Sealing Method for Longshot Plunger Tubes write-up. My design serves to eliminate the most possible dead space while maintaining a leak-free seal between the plunger tube and brass bolt. Let's get down to brass tax!
Sunday, March 31, 2013
18-round magazine mod!

Sup guys!
I know that I haven't posted a real mod in quite a while, so I'm pleased to bring you a T da B original! This mod is incredibly useful if you own any clip-fed N-Strike blasters and use modified darts (Stefans). If you have ever tried loading a N-Strike magazine full of Stefans, you may have noticed that the darts refuse to stay lined up. They flip over and on top of each other and jam up your blaster pretty quickly, especially with the 18-round mag. This mod serves to eliminate this problem, and without opening up the clip at all!
Wednesday, March 27, 2013
Bilbo Laggins
Hello fellow Nerfers and girlfriend! It has been a while since my last update, and I'm sorry for the lag (hence the title). I assure you that I haven't been resting on my laurels all this time. Here's some of the stuff that has been in the works:
 Notice a couple differences? The polycarbonate trigger is the obvious one. Here's the other one:
 Feast your eyes upon T da B's first paintjob! That's right--I first used three coats of Dupli-color gloss black vinyl dye and then followed it up with two coats of Rustoleum clear gloss acrylic lacquer. Matches the blaster body perfectly.
The last mod that I did is inside the plunger tube. I found that over time, my velocities were steadily dropping and I couldn't explain it. When I removed my plunger rod to prep the plunger tube for painting, I noticed flecks of metal all over the place! It was rust from the K26 spring. I promptly Brasso-ed the shit out of my spring and cleaned out the plunger tube. I added some Teflon tape under my plunger head O-rings for a better seal. With a spring like the K26, it's always better to have a decent amount friction on the plunger walls to accommodate the power. Check it out!
I'd say that it's a hefty improvement.
Longshot Update:
I'm sorry to have tantalized anyone with the picture of the Longshot shell--things didn't quite go according to the plan and I slightly miscalculated. Ok maybe it was big miscalculation. Basically, I tried to get fancy and I ended up f-ing myself in the A. Now I have to completely destroy my breech and start again. Once the plus side, my new design will be better than SgNerf's guaranteed. How? Dead space, my friend--dead space. In the meantime, here's something to reinvigorate that boner:

~T


The last mod that I did is inside the plunger tube. I found that over time, my velocities were steadily dropping and I couldn't explain it. When I removed my plunger rod to prep the plunger tube for painting, I noticed flecks of metal all over the place! It was rust from the K26 spring. I promptly Brasso-ed the shit out of my spring and cleaned out the plunger tube. I added some Teflon tape under my plunger head O-rings for a better seal. With a spring like the K26, it's always better to have a decent amount friction on the plunger walls to accommodate the power. Check it out!
 |
| Before |
 |
| After |
Longshot Update:
I'm sorry to have tantalized anyone with the picture of the Longshot shell--things didn't quite go according to the plan and I slightly miscalculated. Ok maybe it was big miscalculation. Basically, I tried to get fancy and I ended up f-ing myself in the A. Now I have to completely destroy my breech and start again. Once the plus side, my new design will be better than SgNerf's guaranteed. How? Dead space, my friend--dead space. In the meantime, here's something to reinvigorate that boner:

~T
Subscribe to:
Comments (Atom)