Hi folks!
I have finally grown weary of taking barrels in and out of my coupler-ed blasters to reload them. It's time to speed up that reloading process in a sexy way--through the creation of a brass slide breech! This one was inspired (like many of my projects) by the illustrious SgNerf. Check out his original writeup
here. This project is a relatively simple one, but will test your dremeling skills to the max. Without further ado, let's make a slide breech!
Required materials:
- 16'' piece of Schedule 80 1/2'' PVC. This piece of PVC is very special because it perfectly nests 9/16'' brass. Go to the hardware store for this one, since you will need to grab a tube of brass the check the fit of several PVC pipes.
- 1' of 1/2'' brass tubing (K&S brand)
- 1' of 17/32'' brass tubing (K&S brand)
- 2' of 9/16'' brass tubing (K&S brand)
- #10-32 machine screw nut (hex)
- #10-32 cap nut (hex)
- Brasso, or any brass cleaner
- J.B. Weld cold weld 2-part epoxy
- Dremel with 1/4'' diameter sanding bit and cutting wheel.
- Small tubing/pipe cutter
Write-up:
Start out by busting out your Dremel with cutting wheel and cut out a 2cm stub of 1/2'', 17/32'', and 9/16'' brass. Use your sanding bit on your Dremel to clean up your uneven cuts. One side of the 9/16'' stub has to be as flat as possible to get a good seal with the 9/16'' barrel. Then glue the three pieces together with J.B. Weld, with each piece sticking out a little from the tube it is nested in. See the picture below for how mine looks.
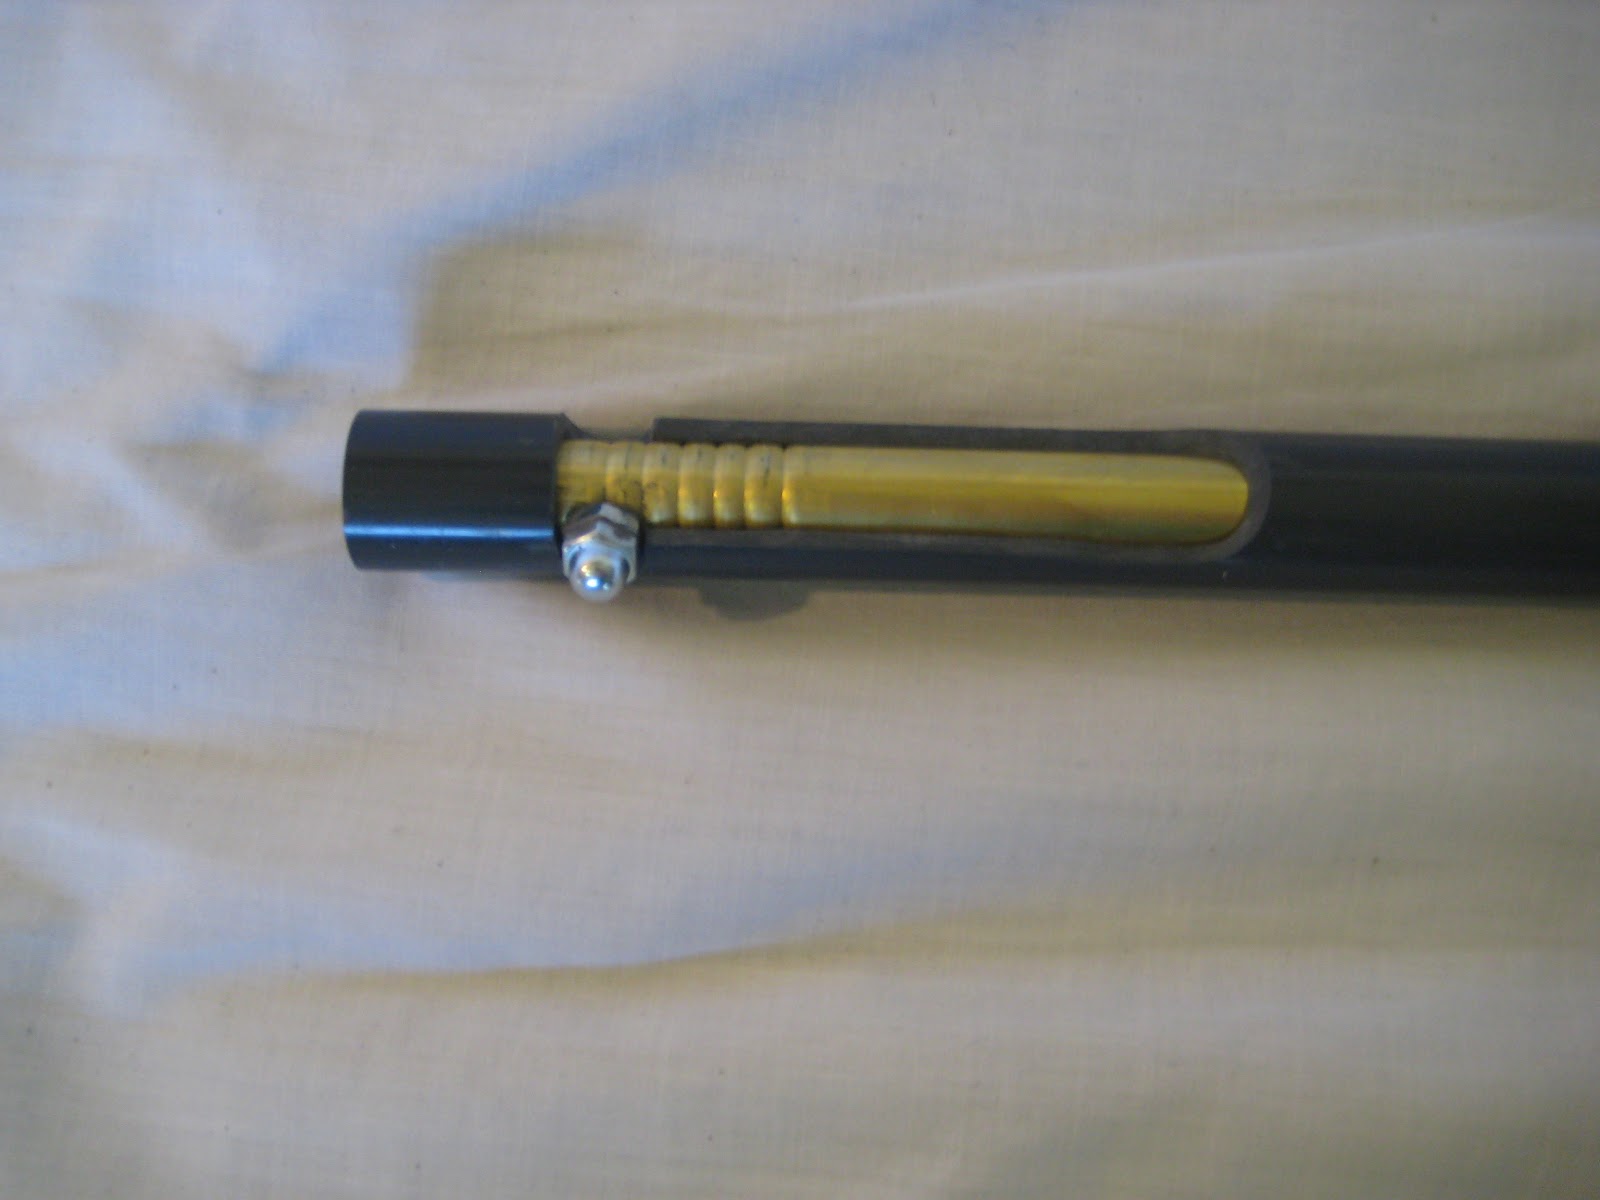
Now it's time to cut out the opening for loading your darts. Hold your freshly glued brass stub up to the end of your PVC. Mark a dot with sharpie on the PVC right at the end of your stub. Mark another dot 3.5'' away from the first. Now you know the length of your opening. Hold a dart on top of your dots and make two dots on either side of the dart to get your width. Now you can take a Dremel and go to town. This is the majority of the work for this mod, so take your time! Make sure you deburr the edges. You'll need the 1/4'' sanding bit to carve out the slots where your nuts can lock the barrel in place. SgNerf's write-up has the locking slot on the left side of his breech, which makes it more suitable for lefties. I realized this after I had already cut the slot for lefties, but then I had the idea to just make it ambidextrous, so I cut a slot on the other side, too. Make sure a hex nut can fit nicely into your slot. Mine looks like this:

Time to take 1' of your 9/16'' brass and polish it up with some Brasso. This part takes some time as well, since you have to get the inside and outside of the tube shiny and clean. I used some pieces of rag and a thin wooden rod to ramrod the the strip of rag down the tube after squirting in some Brasso. Get it nice and shiny both inside and out. You can check the status of the inside by looking into it like a telescope while pointing it almost directly at a light source, using the reflection of light to illuminate the tube's interior.

This next step is my own addition--tightening rings! Take your freshly cleaned 9/16'' barrel and clamp the pipe cutter near one end of it. Make sure you leave enough space between the end of the barrel and the first tightening ring so it can still connect with the stub! Slowly go around with the pipe cutter, gradually tightening. Once you see a nice groove form, loosen up the pipe cutter and move it to the next location. I used 6 tightening rings in 1.25'' of brass, since I wanted the entire dart to be held in place by the rings.

Now it's time to test your fit and mark a dot where you will be gluing your hex nuts--you can see my dot in the picture above. Insert your barrel and stub into the PVC sheath and connect them together exactly how you want them positioned after gluing. Put a hex nut into one of your locking slots and use a sharpie to mark a dot through the middle of the hex nut. Now take your J.B. Weld and it's time glue on your hex nuts--the cap nut on top of the machine screw nut. Don't let too much epoxy clump around the base of your nuts or they will no longer fit into your slots! You can also glue the brass stub into place at this time.
After the epoxy dries, you should have a fully functioning and totally awesome new slide breech! I have to say, the black, gold, and silver all look great together.
Congratulations! You now have a much faster and good-looking way to reload all your coupler-ed single-shot blasters. Keep in mind that this barrel is 12'' long, so you need a pretty powerful blaster to utilize this barrel length. Anyways, I hope you enjoyed this write-up.
Cheers,
~T da B


Where did you get the pink/red foam? Mod Man?
ReplyDeleteGood job. :)
You got it--that's Mod Man's foam. Thanks for the feedback!
DeleteI have seen this mod in person and I must say it is functional and sexy.
ReplyDeleteMostly sexy.