Background:
There is a special place in my heart for the Stampede. It is the only battery-powered direct plunger blaster ever made by Nerf, and the plunger tube is almost as big as the Longshot's! However, let's not get all hot an bothered just yet...The Stampede is one of the most expensive Nerf guns of all time, but it's
for a good reason--you get the blaster plus a shield, foregrip/bipod,
one 6-round clip, and three 18-round clips. The Stampede is terrible out of the box--it fires quite
slowly and has terrible range (~10 feet). Combine that with the crappyness that is
the pink streamline dart and the weight of the 6 D-batteries and you have a blaster that is guaranteed to
get you killed in a Nerf war. Luckily, we're about to do a few mods to the Stampede that will make it one of the most feared fighting weapons on the battlefield! Once again, this mod was inspired by my hero and friend SgNerf--check out the two write-ups I followed
here and
here.
Required materials:
- SgNerf's Stampede Mod Kit (9kg spring, wider O-ring, and plunger padding)
- 4 x AA-sized Trustfire high-discharge lithium ion rechargeable batteries
- Battery holder for 4 AA batteries. This thing is actually a piece of shit--the positive lead ended up snapping on me and I had to replace it. Buy yours at Radio Shack or somewhere else in America for cheaper.
- 1/2'' brass tubing (1')
- 17/32'' brass tubing (1')
- 9/16'' brass tubing (1')
- Schedule 80 PVC that perfectly nests 9/16'' brass
Write-up:
The first part of this mod will be the minimization. This will have no effect on performance and is all cosmetic. I've always though the Stampede to be a pretty big and bulky blaster--much of the shell houses hollow space. Minimization will make the blaster slightly lighter and easier to hold, while also eliminating many of the 40+ screws needed to open the blaster! Take out the battery pack, then cut the blaster along the green lines pictured below. A scroll saw or bandsaw would be ideal, but unfortunately I don't own either one yet. I used a hacksaw for all of the lines except the horizontal one at the back of the blaster which I used a Dremel for.
Clean up all the plastic burrs and make sure to sand down the blaster into your desired form. When finished, it should look nice and compact. In fact, it hardly resembles the stock blaster at all! Here's how mine looks:
Pretty drastic difference in appearance, eh? I may want to cover some of the gaps with plastic or something--we'll see. The next step is to fill in the back part where the battery tray used to slide in. What might properly fit a battery tray-sized hole? Why, a midget battery tray would!
You might be able to fit a couple of those small circular batteries in this battery tray :) In any case, this will fill in the ugly gap in the back of the stampede.
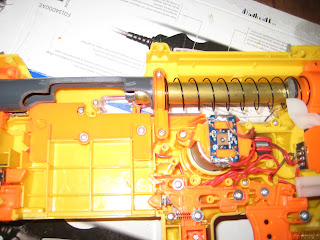
Better? This will also make the stock more structurally sound. Fill dat ass! At this point, it's finally time to open up the Stampede for some much-needed surgery. Marvel at the amazing Hasbro engineering. Suddenly all that money you paid makes sense! I have identified areas of interest below:
Green - Solder the red wire coming up the right side of the trigger to the bottom lead of the 3 leads on the left side of the trigger-activated switch to bypass all locks except for the physical on/off switch. I chose to leave that one as a sort of "safety." Some people go through the trouble of taking out all their lock switches, gluing them down, and putting them back in, but honestly that is completely unnecessary (unless you don't have a soldering iron). Some rudimentary circuit analysis is all you need to make bypassing the locks a breeze!
Purple - Remove this cover to expose the switch that is activated by pulling the trigger. Remove the metal spring rest and replace the spring with a stronger one. This will ensure that the switch recoils fast enough to keep up with the increased rate of fire. After continued debating with myself and more and more experimentation, I'm finally at peace with this--just don't make the spring so strong that it impairs the movement of the breech.
Red - The old battery contacts need to be removed, since they look hideous. I used a pair of needle-nosed pliers to wrench them out, then snipped them off the ends of their wires. You need to solder the leads of your battery holder to those wires. I chose to leave the small capacitor in series with the positive (red) lead, which will prevent current flow after it charges up to 16.8V (supply voltage).
Light blue - I used epoxy putty to cover this opening, since it is notorious for allowing the spring underneath to pop out of it. You should also replace the spring itself to allow faster resetting of the trigger catch activator.
Here is what my wiring looks like after soldering:
I left the physical on/off switch intact, because it's good to have a safety switch handy when investigating jams. You don't want to get you finger caught in a brass breech system--trust me! At this point it's time to prepare your PVC sheath. In SgNerf's
write-up, he uses PVC with a smaller outer diameter than mine. I had to do a few things differently because of this, which I will cover in a bit. Clip a magazine to your piece of PVC and trace an outline around the clip using a sharpie. Now it's time to bust out the Dremel with cutting wheel. DO NOT follow the lines exactly! I did this for my first attempt, and it turned out horribly. You will never get your cuts clean this way. What you want to do is cut an approximation with straight lines and then use a sanding bit to get the corners later. My third attempt looks like this:


Dremeled to perfection! Since I used schedule 80 PVC, I had to sand the end of
the sheath closest to the plunger tube to allow the PVC to fit into the
plastic spring guard. I also had to Dremel the shell near the front to
get a snug fit for the PVC. This sanding must be done extremely
carefully, since the barrel will be flopping around like a limp dick if
you don't. If you do end up sanding too much (like I did), use epoxy putty on the shell or
tape around the barrel to get things snug again.Now, let's get down to making the brass breech and barrel. For the barrel, cut yourself a 21cm piece of 9/16'' brass and give it some tightening rings. Make sure you leave enough space between the first tightening ring and the end of the brass so the breech can fully slip into it.

Now for the breech--cut yourself one 11cm piece of 1/2'' brass, two 2cm pieces of 17/32'', and one 9cm piece of 9/16''. Here's a chart from SgNerf's original write-up that will show you how to glue the pieces together. Make sure you test your fit many times before gluing things together! I found that SgNerf's measurements were a little short--namely the 1/2'' and 9/16'' pieces, but you can just glue the breech sticking out of the plunger tube a little. You should put the PVC sheath in place and screw in the orange spring rest. Let the glue for the breech dry with the breech in place--this will insure that you glue it on straight.
Now you need to glue the black return spring rest to the end of the PVC sheath like so:
At this point, you should stabilize the flimsy part of the barrel with a piece of larger diameter PVC. At first I didn't think it was necessary, but over time the barrel gets bent out of position!
At this point, it's finally time to test to see if things work! When I finally put things together, turned on the blaster, and pulled the trigger, I was horrified to see that my gears were rotating but slipping! I thought all hope was lost at this point, but I opened up the gear casing to see if the problem was fixable. Here is what I discovered:
This problem has finally been solved! Read about it
this recent post I made.
The gear I'm holding has a square hole that sits on a square peg. The increased torque from my Trustfire batteries caused the gear hole to get stripped! Essentially, the square hole is now slightly circular. In any case, I was relieved to know that the teeth were okay, so I applied some Devcon Plastic Welder and I put everything back together. Turned out the Devcon epoxy was not strong enough to handle the torque, so I pulled out the big guns and applied some J.B. Weld. Turns out that it wasn't good enough either! I then had no choice but to bust out the PVC cement. It smells like death and the fumes get you really high while it fuses plastic together. Sadly, even this did not work! Finally, I went back to OG superglue for one last attempt. At this point, I decided that I would just put together the Stampede and mark it as "completed" in my brain. If the gear strips again, then the Stampede will await a new gearbox--honestly I don't feel like making another brass breech! The ideal thing for me would be custom machined parts--namely metal gears. This would allow for any voltage boosts and the corresponding increase in motor torque to be handled with no problems. For now, I'll have to just deal with the crappy plastic.
Here's the brass breech in place. Pretty, ain't she? One thing in the picture is wrong. Can you spot it? The problem is actually the epoxy at the top of the plunger tube. This eventually caused one of my test shots to jam the plunger up against the orange spring rest and it couldn't retract! You must clear the entire length of brass all the way up to the plunger tube, since it actually contacts the PVC sheath. The last step in this mod is to cover any holes in the shell and hot glue the battery tray to the bottom half of the shell. Screw in the orange mini battery tray into the back of the blaster to complete your stock and you can finally cross that finish line. Er--aside from the Stefan-compatible clip, of course! I'll cover that in a future mod guide--no worries.

At last, the beast has been summoned! In between my gearbox failures, I've been able to fire off several shots and I must say that I am most pleased with the results. This little SMG dents cardboard and shoots darts out at at least twice as fast as the stock version. Keep in mind that Trustfires are by no means the best batteries to use--they are just cheap and get the job done. With a more expensive battery setup, you could probably coax even more performance out of this bad boy. However, you then face a host of new problems, including the stripping of the gears, lag in the plunger tube reset, and potential spontaneous combustion of your battery. Mod at your own risk! Anyways, I hope you guys appreciate the Stampede a little more now after seeing what a little brass and a lot of patience can do.
Update (1/27/2013): My Stampede has been inoperable for a while now. I had the pleasure of firing several shots before the superglue gave out. I'm trying to find metal gears or some way to cast them out of epoxy or something stronger than shitty ABS. Perhaps the high-tech machinery of the Tech Shop in San Jose might be able to perform that which I desire.
Update (2/24/2013): I am pleased to announce that I actually found a set of gears! I scoured the entire Earth and finally I have found a company called PAK D in Singapore makes a kit called the "Stampede Stress Kit" that is the golden ticket I needed to get this beast operational! Not sure on the exact price, but it should be around $40, not including shipping. Thankfully, I'm partaking in a bulk order with other Nerfers from Nerfhaven to keep the shipping costs down.
Update (6/4/2013): Support from PAK D has fizzled out and the bulk order has been cancelled. Remedy Metals, an American company that sells PAK D swag, unfortunately does not carry the gears or Longshot shotgun grips. It seems like my Stampede will never see the light of day. The only thing I can think of is casting them out of epoxy resin.
Update (9/18/2013): Finally got around to some Chrony testing, and I'm pleased with the results. Considering this mod was done so long ago, it turned out ok. Now I have made all the mistakes necessary to make my next Stampede (sonic series) godlike!
 |
| Not bad for full auto! |
Cheers,
~T da B


Very nice TdaB! So glad you're doing such advanced modifications.
ReplyDeleteThanks a lot, iMod! It took me quite a while to finish, and there's still more to be done--namely, the POS gearbox.
DeleteIt looks awesome,it remindes me of a Scar-H gun with the stalk desighn!
ReplyDeleteThanks, Nick! I like the minimized look, too--makes the Stampede a lot smaller and easier to wield as well.
Delete